The Joy of Mixing Custom Elements, Web Components, and Markdown
I love Markdown. I write faster and more natively in it than any other format or tool.
If we zoom way out, here’s the most basic philosophy of Markdown: replace complicated stuff with simpler stuff.
That’s all it does, really. It replaces some tedious nested taggy stuff with way simpler stuff that makes more visual sense and is faster to type. At its core, Markdown is really just a bunch of macros.
This website runs on 6,000-ish Markdown files. They’re processed on the server – meaning the Markdig library from .NET processes them, then sends back the resulting HTML. I’m all-in on Markdown, to the point where I wrote my own online editor for it.
Server-side processing of Markdown is a pretty common model – most static site generators fundamentally do the same thing: they process the Markdown, turn it into HTML, and that gets sent to the server (via being written to files).
One of the philosophical points of Markdown is that you can mix it with HTML. Meaning, a Markdown parser is supposed to leave HTML alone – if a line of text looks like it has some tags, the parser should skip it.
This means you can do this:
This is some **Markdown!**

<img src="yay.jpg" />

This is some more ***Markdown!***
And that should work fine. The first and last lines will be processed and transformed, and the middle line will be left alone and output as it’s written.
These were the original rules around inline HTML in Markdown:
The only restrictions are that block-level HTML elements […] must be separated from surrounding content by blank lines, and the start and end tags of the block should not be indented with tabs or spaces.
I didn’t find the need for blank lines in the CommonMark spec, but just note that every Markdown processor might be a little different in this respect, so test.
Anyway, we’ll likely get HTML that’s something like this out of the above Markdown.
<p>This is some <strong>Markdown!</strong></p>
<img src="yay.jpg" />
<p>This is some more <em><strong>Markdown!</strong></em></p>
Our img tag is intact and has been left alone.
This is great, and helps you in some sticky situations. You can effectively “escape out” to HTML when you need to.
However, this still leaves you with the problem where you might have a bunch of complicated, tedious HTML that forms a repeatable component of some kind that you don’t want to hand-manage and reproduce over and over. What if you want a Markdown-friendly way to represent a feedback form, or a tabbed UI, or a mortgage calculator, or something else way beyond the scope of text formatting.
For these situations, what you really want is to put a token or a placeholder in your Markdown, and have something else expand it later on into a larger, more complicated HTML construct.
What you sort of need is… Markdown for More Complicated HTML™.
Enter Custom Elements.
These have been around a long time. They tend to get lost behind all the attention paid to the big client-side frameworks like React, but the first public spec was published in 2013, finalized in 2016, and we’ve had broad browser support since 2018 or so.
Custom Elements can do a lot, but a core function is that they divorce the source markup from what’s effectively output into the DOM.
You can write X in the markup; the Custom Element will output Y into the DOM.
X is simple; Y is way more complicated.
X is written by an editor; Y is written by logical processing.
So, considered at that level, Custom Elements can be used as… HTML macros.
This means that when you combine them with Markdown, you get a really neat synergy of features.
- Markdown expands into text formatting
- Custom Elements (that the Markdown processor ignores) expands into more complicated stuff
Consider this scenario: you have a blog post which is Part 1 of a series. You want to let people subscribe to be notified about Part 2, but that involves a little widget of some kind in the HTML. And for whatever reason, you have to put this between two paragraphs.
What if you could do this:
This is some **Markdown!**

<subscribe-to />

This is some more **Markdown!**
(Remember, that middle line is HTML, so the Markdown processor will leave it alone.)
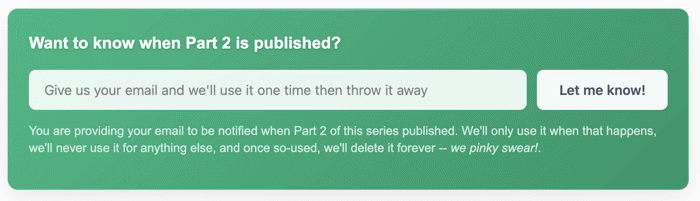
Then, in the browser, that subscribe-to tag will expand into something like this:
<div part="outer">
  <label part="label">Want to know when Part 2 is published?</label>
  <input part="input" type="text" name="email" placeholder="Give us your email">
  <button part="button" type="button">Let me know!</button>
</div>
This is exactly what Custom Elements can do.
To be clear, this is not a tutorial about Custom Elements in general – there’s a lot of depth there – but just a joyful discovery of what happens when we combine them with hand-written Markdown and come to the conclusion that both Custom Elements and Markdown sort of operate on the same principle from the perspective of the writer: they replace simpler stuff with more complex stuff.
Custom Elements can just be simple tokens like the above (actually, what’s above is not quite valid, but more on that below), or you can expose configuration parameters to make them more usable in more situations:
This is some **Markdown!**

<subscribe-to buttonText="Get me the details!" />

This is some more **Markdown!**
You can even put stuff between Custom Element tags then use that in the processing and output. (You can go even further, by defining child tag structures and “slots” and all sorts of stuff that we won’t get into. Again, there’s so much depth there…)
This is some **Markdown!**

<subscribe-to>

We'll use your email once, then delete it. _We promise!_

</subscribe-to>

This is some more **Markdown!**
Guess what happens to that line between the subscribe-to tags? Yes, it gets processed by the Markdown engine, because it’s not HTML – there’s no tag on that line. So the Markdown engine will process it, but leave the line above and below it alone, resulting in this:
<subscribe-to>
  <p>We'll use your email once, then delete it. <em>We promise!</em></p>
</subscribe-to>
During a bout of insomnia, I did some local testing of the general theory.
I had Claude vibe-code a simple Node script that read a Markdown file which looked a lot like the samples above (Markdown paragraphs above and below, with a subscribe-to Custom Element in the middle). Then it processed the Markdown – Custom Element included – and output the result into a file.
Here’s the Markdown source. There are two subscribe-to tags in there – one simple version, and one with a bunch of options I thought up.
You can see that when the browser encounters this –
<subscribe-to />
– it expands into HTML (in a shadow DOM) that ends up looking like this in the browser:

Or this when you add some advanced options:
(That’s raw HTML; you can view the source. Understand that it’s still subscribe-to in the source, but inspect the DOM and you can see what it effectively expands into. The JavaScript definition for the Custom Element is inline in the HTML doc. I used Lit as a base because it makes a lot of things so much easier.)
I just love this.
An editor has Markdown acting as text macros, Custom Elements acting as HTML macros, and they can mix the two in the same file. Simpler things become more complicated things. They can use Gruber’s “escape hatch” to handle infinitely complexity while being abstracted away from verbosity.
This opens some lovely possibilities for page, layout, and element complexity and functionality while retaining the “I wrote it in a simple text editor!” joy that made Markdown so awesome to start with.
Postscript: Minor Technical Note
I’ve been lying to you a little in this entire document. You actually can’t do this:
<subscribe-to />
Custom Elements cannot be self-closing (or a “void tag,” as they’re called). You technically have to do this:
<subscribe-to></subscribe-to>
The self-closing version will work sometimes, kind of accidentally. Where it falls apart is when you put something between the tags, because the browser considers the self-closing tag as just the opening tag, which it then claims never closes.
But here’s how and why I started lying to you displaying the self-closing version.
Because – and stick with me here – here’s something else you can’t do: put your tag attributes on multiple lines.
<subscribe-to
  buttonText="I love getting email!"
  anotherAttribute="Another value"
>
This time, it’s not the browser that’s the problem – the browser is totally fine with you breaking out the attributes to their own lines. This time, it’s the Markdown engine. It looks at those middle lines and decides that they’re not HTML, not understanding that it’s logically part of the opening tag. This means that – you guessed it – the Markdown engine tries to process it and everything falls apart.
(As noted above, this might vary a bit between Markdown engines. Claude picked Marked for this POC.)
I didn’t like that I couldn’t do this. I wanted to be able to break out all my attributes on their own lines.
To solve this, I had Claude vibe up a simple (?) Markdown pre-processor. So before the source Markdown got fed into Marked, some code in the Node app “fixes” the tag – reassembles it all back on the same line.
And, while I was doing that, I also “fixed” the self-closing tag issue. If the code detected a self-closing tag that contained a dash (which Custom Elements must), it changed it to an explicitly closed tag. That’s why I showed you the self-closing tag. But know that by the time it got to the Markdown engine, it was explicitly closed.
It was just cleaner and less confusing while I was early in the explanation.
Here’s the source of the Node app with the preprocessor in a (pretty gross-looking) function called preprocessMarkdown.
(Full disclosure: I didn’t even bother to check this. It was just a POC, so I had Claude write it. I could have written it myself, but didn’t want to put in the effort for something with no larger goal.)
Postscript: Fun and Madness with Markdown Preprocessing
Once you crack open the door of Markdown pre-processing, you can be sorely tempted to head further down that road. For instance, if you don’t like the idea of raw HTML in your Markdown, you could essentially write your own mini-language.
For example, something like:
@:subscribe-to
 buttonText: I love email!
 placeHolder: Give us your email!
All you have to do is write some preprocessing code that detects that construct and forms it into the Custom Element tag.
Is that “better” than raw HTML? I don’t know… maybe?
The looming problem is that this is just one simplistic Custom Element example. When you get into more advanced features like child tag structures and slots and such, you’d probably end up re-interpreting and re-implementing way more of the HTML spec than you want to.
I predict there will be a point where you regret trying to do this. Pre-processing and the initial excitement of a domain-specific language is a siren that might lead you to your doom.
(I swear, I have never tried to do something this foolish… I swear…)
Postscript: Fun with Language Design
When you realize that Custom Elements effectively abstract writing HTML away from deeper logical programming, you realize that designing the logical interface of your Custom Elements is a fun exercise in language design.
The basic principle becomes: don’t ask for anything you don’t absolutely need. Do as much work as possible for your editors in code. Require them to provide as little information as possible.
If we want to embed a feedback form, for instance, we could do something like this:
<input-form submitButtonText="Send message!">
  <input-text label="Your Name" spec="required >4" />
  <input-text label="Your Email" spec="required email" />
  <input-text label="Ticket Number" spec="required regex:[A-Z]{2}[0-9]{4}" />
  <input-text label="Your Message" spec="required multiline" />
  <submit-message>
    <p>Thanks for your submission! We normally respond in two business days.</p>
  </submit-message>
</input-form>
This provides everything we (the developers) need to render a feedback form.
- We control the layout, so we’ll expand those
input-texttags into multi-tag constructs to render each field. - We can assume that things like the form
METHODandACTIONare standardized to the site, so we don’t need to ask for those. - We can automatically obtain the URL/page from which they submitted. We could even develop some system where data from specific
METAtags in theHEADare written to the form in hidden fields, meaning additional data can be injected into the form at the page templating level. - We assume the form needs a submit button, so there’s no need to specify it.
- We can provide an “override default setting” model, where lots of stuff have default values that will be used if not provided. For example, I’m passing in
submitButtonText, but that would certainly have a default value (“Submit Form”) that would be used if I didn’t feel like changing it. - Inside the
input-texttags, we can roll up validation (required,>4meaning at least five characters) and UI (multiline) specification into the sameSPECattribute, so we have no need for another tag fortextarea. - We can derive all the field names from the
label. Assuming we submit the form with client-side code, we could easily find the value of the thelabelfor each input field via theforattribute, then serialize and submit that data as well, so the server would also get the “friendly name” of each input field.
What we’ve done here is designed a specification language – two of them, actually.
- The combination of tags to specify the information we need to display and submit the form
- The embedded
specvalues which define validation and UI variations
This is really, really fun. You start to ask interesting questions about what information you actually need explicitly, and what information you can derive. You’ll find situations where you can make vast changes based on fun combinations of explicit information and environmental data.
It’s not hard to put together something that is unique to your specific situation and strikes a lovely combination among granularity, utility, and simplicity.
Postscript: Processing Markdown Client-Side
The original point of this post was about how to mix Markdown that’s processed server-side with Custom Elements that are processed client-side. As I noted, this is a common model, and the basis for all of the static site generation that happens these days.
But, what if you just wanted to process the Markdown client-side as well?
You certainly can. I’ve read that md-block is quite good for this.
I don’t do it for a few reasons:
- I still have weird hang-ups about sending content source to the browser. Something about airing my dirty laundry? It’s not entirely rational, and I’ve spent a lot of time thinking about how it correlates to breaking the fourth wall.
- I wrote a bunch of Markdig extensions specific to my site and needs. I wrote these in C#, so I wouldn’t be able to port them to the browser (…I don’t think? WASM might be able to do it?). Some client-side implementations might have extension frameworks too (here’s an example of one in zero-md), however my Markdown usage on this site extends back six years to when I was really a “C# or death” kind of guy.
- Some of the extensions I wrote require information from the server, which means rendering the Markdown in the browser would require multiple round-trips back to the server to get information, and I don’t love this.
If you did want to render client-side, there’s also a bit of a perspective shift needed. Somewhat ironically in the context of this post, you’d need to surround your Markdown in a Custom Element (like the aforementioned md-block tag).
This means that your Markdown rendering is a Custom Element on the same “level” as the Custom Elements we’ve been talking about above. The Custom Elements are not “embedded and ignored” by the Markdown engine, but rather they exist “alongside” the Markdown.
Depending on the Markdown library, you might need to close that tag before opening the Custom Element.
Like:
<client-markdown>
  This is some ***Markdown!***
</client-markdown>
<subscribe-to />
<client-markdown>
  This is some more ***Markdown!***
</client-markdown>
Your need to do this probably depends on the library you use. I can’t generalize with any authority.
In the end, your document is now fully an HTML document, not a Markdown document that becomes an HTML document. It’s a minor perspective shift, but might have some cascading effects on things I’ve written above.
Postscript: Processing Custom Elements Server-Side
You can also do the opposite of the above – if your server-side process is running in JavaScript (so, something like Node, Deno, or Bun), you can render the Custom Elements into expanded HTML on the server and send the HTML.
I have never done this, but Lit supports it. They even have a library that will re-hydrate the resulting HTML into “regular” Custom Elements when the page is finished loading.
Clearly, unless you do that, you’re not going to get any interactivity, so this is mostly useful as a templating language (…I think? Honestly, I know very little about it, other than that it exists).
Update: Additional Links
Added on
This post got some good traction on Hacker News, and a few interesting resources popped up there. Additionally, lots of people emailed me after reading the thread to offer more links.
Markdown UI is an attempt to basically do what I did above, but in some type of Markdown language.
MDX is an attempt to combine Markdown and the JDX language from React
MarkDoc is a Markdown-based documentation format made by Stripe. It looks like a mix of Markdown and Liquid
VitePress is some combination of Markdown and Vue
react-markdown-with-mdx is something I do not understand very well. The description is “Higher Order Component to add MDX syntax support to react-markdown,” and there there is a long explanation here